Put your hand up if you are on Facebook. Cool, me too. In fact, nowadays most people are. Because why not, it’s an awesome way to keep up with friends, latest news and more.
However, what about your team? Yes, your sports team.
You see, next to a well-designed team website, a team Facebook page is another great communication tool to get more exposure, find fans, supporters and keep the ones you have up to date.
A Facebook page allows you to share training photos, game results, victory celebrations and other news while giving your followers the chance to interact with you directly.
So why isn’t every club or team on Facebook?
Well, one of the reasons is that creating and running a professional Facebook page can be overwhelming. There is a lot to consider and it takes a bit of work to do it properly.
That is probably the reason why many Facebook pages look unprofessional, aren’t well-maintained or informative and overall more on the sucky end of the spectrum.
To make sure you don’t fall into this trap, in the following article we will take a look at how to create a professional sports team Facebook page that fulfills its purpose.
You with me? Then let’s get going.
How to Set up a Facebook Page for Your Sports Team
In order to have a professional Facebook page, you need to have one to begin with. After all, you need a canvas before you can start painting, right? So let’s begin with that.
Creating the Page
The easiest way to set up a Facebook page is to use your existing account.
(You have one right? Otherwise why did you put up your hand in the beginning?)
Don’t worry, that doesn’t mean the person who sets up the page will be stuck with maintaining it. You can always invite more administrators.
Plus, later on we will look at how to create a Facebook page independent of any account, which is a bit more complicated.
If you are hesitant because you think that your personal account will be associated with the page, don’t sweat it. The two are completely separate and nobody can even see you are an admin.
So, for the beginning we will need one person with a Facebook account to create the page. If that’s the person who will take care of the page later, even better. Here are the steps:
1. Log in to your Facebook account
Go to the Facebook homepage and input your login information. If you don’t have an account yet, now is the time to create one.
2. Create a new page
To create a Facebook page, go to http://facebook.com/pages/create or click the Create Page link under Pages in the left sidebar.

3. Choose the right category
Now you will be asked to choose which category your page belongs to. You can find Sports Team under Entertainment, which is probably the most fitting choice.
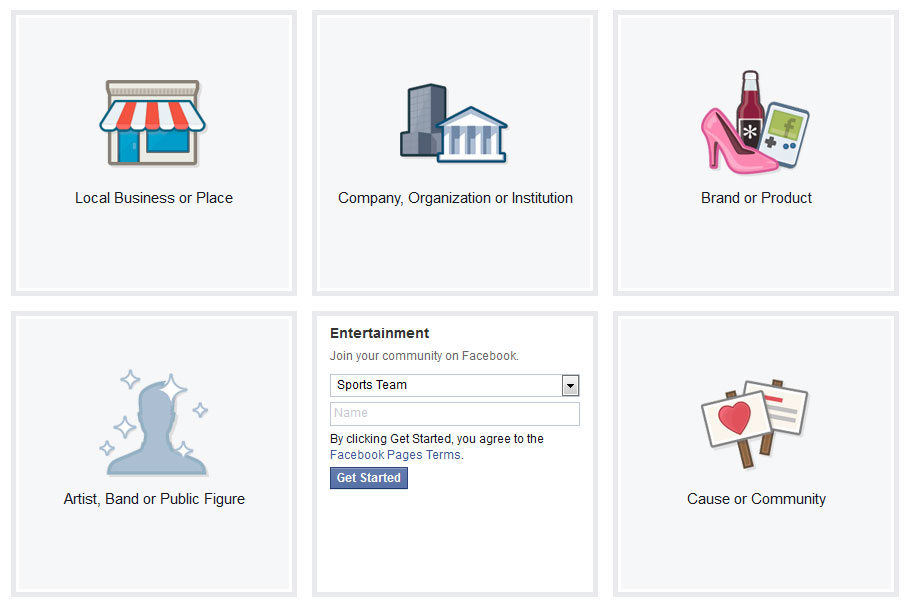
4. Input your team name
After picking a category, you will be able to input your page title (i.e. team or club name). While this might seem like a no-brainer, there are some important considerations.
First of all, Facebook only allows you to change your page name once and it’s a tedious process to do so. Therefore, you should make sure to get it right from the beginning.
Of course, simply using your team or club name is the obvious choice.
However, you might want to think about adding some extra information like “[Your Team Name] – The First Rugby Club in Sydney”.
Setting your name up like this will give you a number of extra keywords that others can find you under in Facebook’s search.
In this case “Rugby”, “Sydney”, “Rugby Club Sydney” and more.
Keep in mind though that your page title is limited to 70 characters.
Apart from that, Facebook insists on capitalizing the first character of your name and doesn’t allow unconventional capitalization (like WaterPolo).
You can petition to have the name changed later, but in the beginning you are unfortunately stuck with these limitations.
However, I am sure you can still come up with something that describes your team well and sounds good, too.
4. Finish the setup
After inputting your page name, you can proceed by clicking the button that says Get Started.
In the next few steps you are asked to provide additional information for your page. You can skip these steps for now since we will be talking about them in detail further below.
After that congratulations, you just created your very own basic Facebook page!
One more action you might want to take at this point is to unpublish it. That way nobody will be able to find it before you are completely satisfied with how it represents your team.
To do so, go to your page and find the Settings link in the upper right corner. Click it.
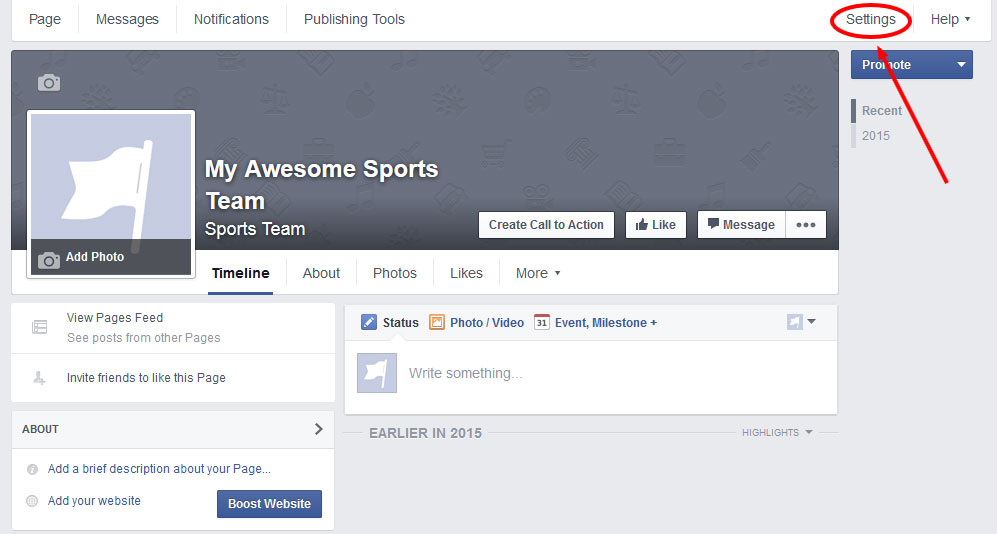
After that, find the Page Visibility item and click on Edit.
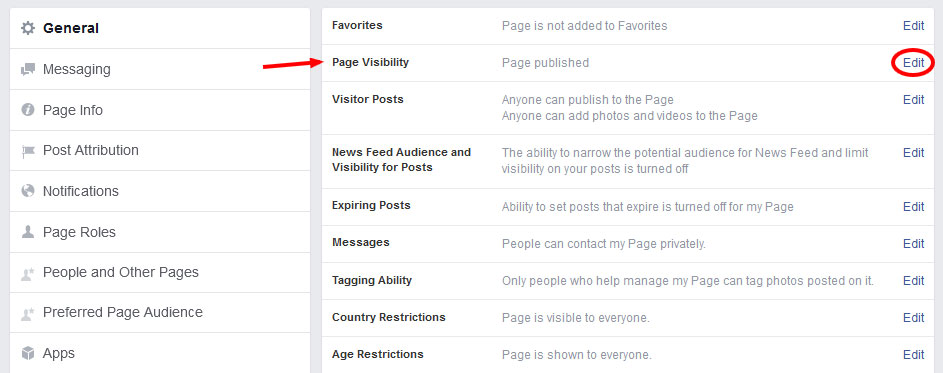
Now simply check the Unpublish Page box and save the changes. Done.

Converting a Facebook Profile to a Page
In earlier times it used to be possible to set up a page without having a personal profile, but apparently that has changed.
However, there is still a trick how you can create a Facebook page without ending up with yet annother social account.
For that, you do need to first create a new profile (which can be a bit tricky with the high demands Facebook is putting on the info it asks for) and then use the Profile to Page Migration tool to turn it into a page.
As I said earlier, it’s a bit more complicated but it does the trick.
Inviting Other Administrators
Taking care of your team’s Facebook page doesn’t have to be a one-person job. You can always invite other club members to join the fun. Here’s how:
1. Click Settings at the top right corner of your page.
2. Look for Page Roles in the left column.
3. If the person you want to invite is your Facebook friend, you can simply type their name and pick them from a list. If not, inviting people through their email address is also possible.
4. The drop-down menu where it says Editor enables you to choose a role for the newcomer.

Here is a list of each role’s abilities in case you don’t know what to pick.
5. To add several people at once, click Add Another Person.
6. Save and enter your password to confirm.
That’s it. From now on the burden of running the page won’t be entirely yours anymore. Yet, that also means it’s time to make it look its best.
Your New Facebook Page — First Steps
To use the page effectively, it is important that you take advantage of the possibilities Facebook has to offer.
However, that doesn’t mean you have to use all available options. In the following, we will go over the most important settings and options to make your page shine.
Upload a Profile Picture
Just like in a personal profile, it’s a good idea to upload an image representing your team.
Not only will it appear on your page but also in the Facebook search results and next to every comment you make as your page.
As a sports team it’s, of course, always a good idea to use your own logo here (as you should on your website). But you can also create a custom image.
To set a profile picture, go to the front of your page. You will find an Add Photo link in the field where your page thumbnail will appear. Click it and then choose Upload Photo.
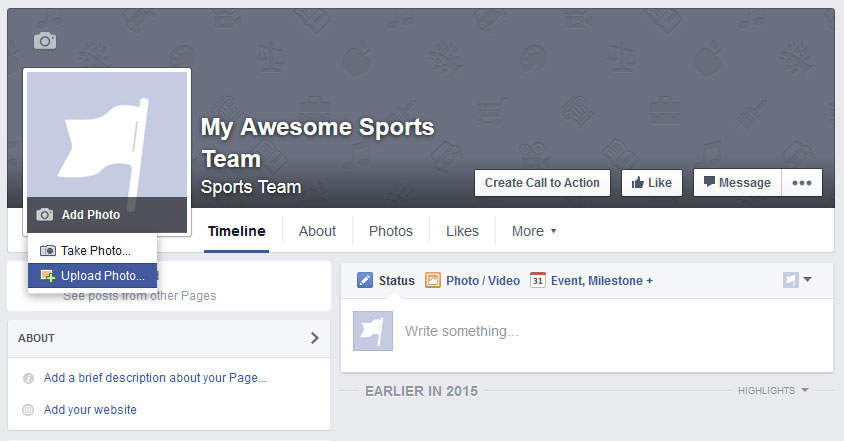
Now you can browse to an image on your hard drive. The ideal size for a page thumbnail is 180 x 180 pixels, even if it is displayed slightly smaller.
You can also upload larger dimensions. In any case, make sure the image is square. Don’t worry, you can always change it if you are not satisfied.
Add a Cover
Your page’s cover image (i.e. the large banner at the top of your page behind the profile picture) is just as important.
It allows you to convey a lot of information about your team at a single glance. After all, a picture says more than a thousand words as the old adage goes.
To upload a banner image, simply click on Add a Cover and Upload Photo. The ideal dimension here are 851 x 315 pixels (because why go with something easy to remember?).
When choosing a visual, try to make sure it fits the rest of your page and that it isn’t too generic. Something personal and representative of your team is a much better option.
Here are a few motif ideas:
- An image from practice or a game
- Your home stadium/field
- A team group photo
- Something that symbolizes your sport (ball, bat, etc.)
- A special achievement (such as a trophy)
The cover can also be used to call attention to current events — such as upcoming games — if you have the manpower to produce custom images and change them often.
After recent changes in Facebook’s rules, it is now also allowed to include a call to action in the header image, which can be used to collect likes or ask people to attend your games.
The most important part is that the image fits the rest of your page, represents your team well and fits the way you want to be perceived from the outside.
Filling in the About Page Information
One of the most important parts of your sports team Facebook page is the About section. You can get there by clicking About on your main page.
This part will contain a lot of important information for those more deeply interested in your team or club. Yet, everything found here also matters in terms of search optimization.
Because of that, make sure that any content you add here is both descriptive and keyword rich.
Of course some information is more important than others and below we will only be talking about the parts that really matter. You are free to fill in the rest as well though.
Pick a Unique Web Address
In the About section, you can claim a dedicated web address for your Facebook page.
That way it will appear under http://facebook.com/yoursitename instead of http://facebook.com/randomlongstringofnumbers.
This makes it much easier to promote your page and include its address in other marketing material.
Come up with a couple of memorable URL options and check them for availability. If your address is already taken, consider adding your sport at the end or some other relevant info.
Fill in the Short Description
Don’t let the name fool you. Although only 155 characters long, the short description is an important element because it shows up very prominently right on your page.
(Technically, the short description can also be longer than 155 characters, but only the first part will be displayed on the page.)
Therefore, it is important that you make the most of it. Here are a few pointers:
- Be precise — descriptive but to the point
- Make sure to hit all relevant keywords
- Include a link to your website or other web presences
No need to write an essay here, you can tell us all about your team’s history in the long description.
Write a Long Description
The long description field is where you can embrace your inner novelist. Provide any information about your sports team or club that you deem relevant or interesting.
Tell the story of how it was founded, mention milestones, achievements, goals, values and anything else you can think of that fans, followers and players would care to learn about.
Don’t forget about incorporating keywords as well!
Address, Phone Number, Email and/or Website
Providing up-to-date contact information on your Facebook page is pretty vital.
Imagine someone wants to sponsor your team and doesn’t know how to get in touch — what a catastrophe!
Therefore, it’s important that you provide some way for people to contact you. An email address might be the easiest, but the choice is up to you.
Of course, several options are possible (and appreciated).
Provide an Impressum (Maybe?)
Whether or not you have to fill in this part depends on your country of residence.
If you live in a country where an impressum is required by law (such as my home country Germany), it’s really important to fill this out for legal reasons.
Otherwise you can skip this part completely.
Managing Permissions
By now all important content on your page has been filled in and we are almost ready to start posting.
However, before we do, there are a few permission settings to consider that control what visitors are allowed and not allowed to do on your page.
Set Visitor Posts and Tagging Ability
Under Settings > General > Visitor Posts you can find the option to switch posts by visitors on your page on or off.
If permitted, your fans and followers can leave comments (and optionally photos and videos) on your page indiscriminately.
A middle ground also exists, in which posts by externals are first sent into a moderation cue and have to be approved by you before appearing on the page.
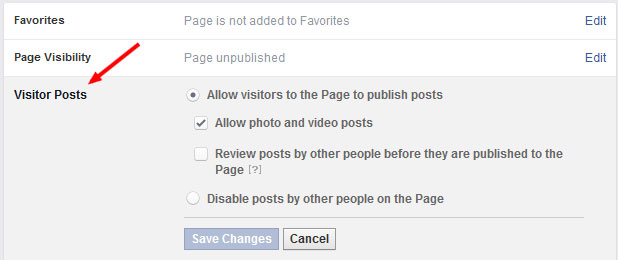
Generally it’s a good idea to give your fans the ability to cheer you on virtually. The more stuff is happening on your Facebook page, the better.
However, the decision is up to you and depends on your preferences and capacities. Of course, you can always give it a try first and make your decision according to the response.
The same goes for fans tagging themselves in your posted images, which can be controlled a little further down the line.
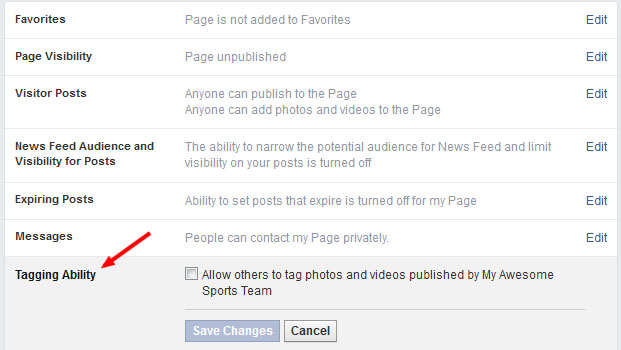
When you click Edit here, you can allow everyone who has liked you page to tag themselves in images — such as game day pictures — that appear on your page.
Otherwise only those who manage the page have this ability.
(Optionally) Disable Messaging
By default, visitors have the ability to contact page admins (that’s you!) with private messages like on a personal profile.
It’s a nice touch, especially if you reply to them. Because what is better than getting a personal reply from your favorite team?
However, since all of us already have numerous inboxes, creating one more might sound unappealing to you and I can’t blame you.
Or maybe you decided for another tool as you primary means of communication.
In both cases, you are free to completely switch messaging off. However, when you do, make sure it’s easy to find some other way to get in contact with you.
But What Should I Post?
Alright, that’s it. You now have a very good basis to start from and your page is almost ready to see the light of day.
However, what is the central part of any Facebook page? Exactly, the content.
For that reason, it’s a good idea to publish a few things on your page before inviting others to view and like it.
That way they get a better impression on what you will be sharing and might be more likely to follow the page and come around more often.
This is also a good opportunity to think through your future content strategy so you yourself have an idea of what you want your page to be about.
Facebook allows the following content types:
- Plain text status
- Photo with caption
- Link with caption
- Video with caption
- Event page
- Location check-in
As a page admin that gives you a number of possibilities for posting material. Here are a few ideas to get your started:
- Sport- and/or team-related questions
- Images and videos from training and matches
- Check-ins at matches and training locations
- Shares from players and club members
- Birthdays of players or important figures in your sport
- Relevant articles and links
- Updates from your club
- Game results in image form
- Live updates during half time
- Exclusive content from behind the scenes
I’m sure you can come up with more. It’s a good idea to use a variety of content to keep the entertainment factor high.
You might also want to check out our marketing ideas for sports teams for additional inspiration.
Final Steps
Almost there. Just a few more steps are left to finally get your page up and running and start if off with a fanfare:
- Publish your page to make it visible to the public.
- Like your own page (first like, yay!).
- Invite friends, club members, family and supporters via email (Facebok has an automatic service for this, but it’s better if you do it personally).
- Publish your page on your Facebook profile and ask your own contacts to like it (other administrators can do the same).
- Add the page to your favorites for quick access (Pages > Option icon > Add to Favorites).
And that’s it. You now have your very own sports team Facebook page and took your first steps to make it popular. Very nice job. Virtual high five!
Facebook Pages for Sports Teams Summarized
If done right, Facebook — and especially Facebook pages — can be a highly effective marketing tool for sports teams and clubs.
For that reason, learning how to create a professional sports team Facebook page is imperative for anyone involved with promoting their own or someone else’s club.
They provide you with a variety of tools and options to present your team in a compelling way and communicate with your audience of fans and followers. Plus, it’s free!
Hopefully in this tutorial you have not only learned how to set up and configure your own page but have also gained some insight on how to use it in the future. Good luck!


